Difference between revisions of "Manage Related Information"
imported>Aeric |
imported>Aeric m (Text replace - 'Designer > Data >' to 'Designer >') |
||
| (8 intermediate revisions by the same user not shown) | |||
| Line 1: | Line 1: | ||
The Manage Related Information | The Manage Related Information [[File:Managerelatedinfobutton.gif]] icon lets you use [[JavaScript]] to build action buttons to carry out add, edit and delete action buttons in the [[Related Information]] section of a [[Record]]. | ||
: | ==Managing Related Information== | ||
:* The Manage Related Information [[File:Managerelatedinfobutton.gif]] icon appears when editing object [[Forms]]. | |||
:* It only appears in custom Related Information sections (those you add). It does not appear in the standard pre-defined Related Information sections for related Tasks and such. | |||
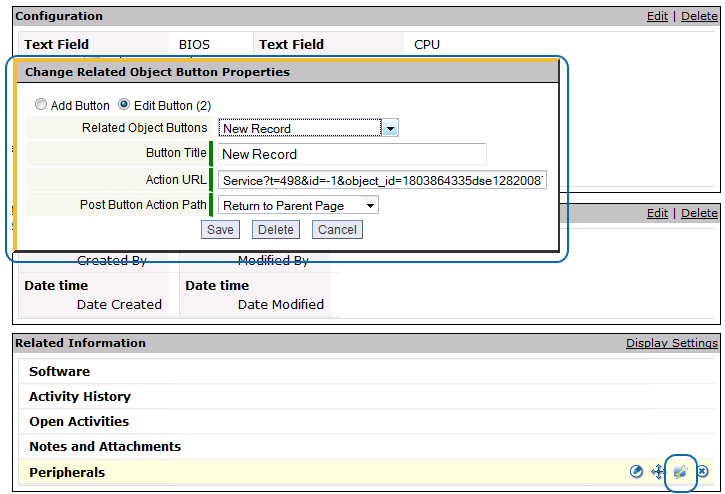
:* In those sections, it appears at the lower right, in a group of icons: | |||
:::[[File:ChangeRelatedObjectSectionIcon.png]] | |||
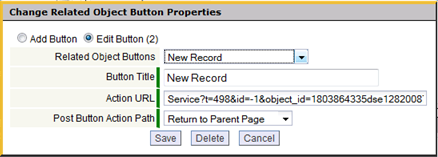
::The properties dialog appears: | |||
:::[[File:ChangeRelatedObjectButtonDialog.png]] | |||
:''Learn more:'' | |||
:* [[Actions]] | |||
:* [[Workflows#Workflow Actions|Workflow Actions]] | |||
== | ==Working with Action Buttons in a Related Information Section== | ||
Action buttons can be created in a Related Information Section, based on a URL of any legitimate [[Page]], [[Component]], [[Action]], etc. that can be created in the platform. | Action buttons can be created in a Related Information Section, based on a URL of any legitimate [[Page]], [[Component]], [[Action]], etc. that can be created in the platform. | ||
===Add an Action Button=== | ===Add an Action Button=== | ||
#Click '''Designer | #Click '''Designer > Objects''' | ||
#:*Open the desired object | #:*Open the desired object | ||
#:*Click the [[Forms]] tab | #:*Click the [[Forms]] tab | ||
#:*Navigate to the desired section in the Related Information section and click the Manage Related Information [[File:Managerelatedinfobutton.gif]] icon | #:*Navigate to the desired section in the Related Information section and click the Manage Related Information [[File:Managerelatedinfobutton.gif]] icon | ||
#Complete the following information: | #Complete the following information: | ||
#:;Add Button:Select the "Add" radio button | #:;Add Button:Select the "Add" radio button | ||
#:;Button Title:Label on the button | #:;Button Title:Label on the button | ||
#:;[[#Action URL|Action URL]]:Paste the URL of the desired action | #:;[[#Action URL|Action URL]]:Paste the URL of the desired action | ||
#:;Post Button Action Path:Choose the page to display after the action is executed | #:;Post Button Action Path:Choose the page to display after the action is executed: | ||
#::;Stay at new Object Page:After action is executed on new object, display new object page | #::;Stay at new Object Page:After action is executed on new object, display new object page | ||
#::;Return to Parent Page:After action is executed, return to the original page | #::;Return to Parent Page:After action is executed, return to the original page | ||
| Line 27: | Line 32: | ||
===Edit an Action Button=== | ===Edit an Action Button=== | ||
#Click '''Designer | #Click '''Designer > Objects ''' | ||
#:*Open the desired object | #:*Open the desired object | ||
#:*Navigate to the desired section in the Related Information section and click the Manage Related Information [[File:Managerelatedinfobutton.gif]] icon | #:*Navigate to the desired section in the Related Information section and click the Manage Related Information [[File:Managerelatedinfobutton.gif]] icon | ||
| Line 42: | Line 47: | ||
#Optionally, [Delete] the action button | #Optionally, [Delete] the action button | ||
==Action URL== | ==Creating an Action URL== | ||
{{:Action URL}} | |||
<noinclude> | |||
< | |||
[[Category:JavaScript]] | |||
</noinclude> | |||
</ | |||
Latest revision as of 23:24, 22 June 2012
The Manage Related Information ![]() icon lets you use JavaScript to build action buttons to carry out add, edit and delete action buttons in the Related Information section of a Record.
icon lets you use JavaScript to build action buttons to carry out add, edit and delete action buttons in the Related Information section of a Record.
Managing Related Information
- The Manage Related Information
 icon appears when editing object Forms.
 - It only appears in custom Related Information sections (those you add). It does not appear in the standard pre-defined Related Information sections for related Tasks and such.
- In those sections, it appears at the lower right, in a group of icons:
- The Manage Related Information
- Learn more:
Working with Action Buttons in a Related Information Section
Action buttons can be created in a Related Information Section, based on a URL of any legitimate Page, Component, Action, etc. that can be created in the platform.
Add an Action Button
- Click Designer > Objects
- Open the desired object
- Click the Forms tab
- Navigate to the desired section in the Related Information section and click the Manage Related Information
 icon
icon
- Complete the following information:
- Add Button
- Select the "Add" radio button
- Button Title
- Label on the button
- Action URL
- Paste the URL of the desired action
- Post Button Action Path
- Choose the page to display after the action is executed:
- Stay at new Object Page
- After action is executed on new object, display new object page
- Return to Parent Page
- After action is executed, return to the original page
- Click [Save]
- Optionally, [Delete] the action button
Edit an Action Button
- Click Designer > Objects
- Complete the following information:
- Edit Button
- Select the "Edit" radio button
- Related Object Buttons
- Choose the related object button to display
- Button Title
- Label on the button
- Action URL
- Prepopulates, but can be modified if needed
- Post Button Action Path
- Choose the page to display after the action is executed
- Stay at new Object Page
- After action is executed on new object, display new object page
- Return to Parent Page
- After action is executed, return to the original page
- Click [Save]
- Optionally, [Delete] the action button
Creating an Action URL
About Action URLs
When any tab or action button is clicked in the UI, the screen refreshes to display a new page, as determined by the URL of the page. URLs can identify Objects or Records and can initiate Actions such as Add/Update/Delete.
When building URLs for Action buttons in a Related Information section, it is possible to:
- Execute a JavaScript action
- Launch a new page via URL
- The new page can point to an external site, or it can perform these actions in the platform:
- Add a new record
- Pass field values of the current record as parameters to another page
- Pre-populate another record with data from the current record
Using Service Numbers to Build an Action URL
URLs are designed using Service Numbers, which are unique numbers associated with each Object and Action. A Service Number uses the (Service?t=) syntax.
Tip: To build a custom Action URL, best practice is to walk through the steps in the UI first, and take note of the Service?t=nnnn part of the URL.
For example, click the Accounts tab. The last part of the URL is:
- Service?t=200&top_tab=accounts
Or, click the [Add Action] button, and note that the last part of the URL now looks like this:
- Service?t=202&id=-1&a=add
- Examples of Service Numbers in Objects and Actions
Service?t=200 Accounts
Service?t=202 New Account
Service?t=14 Tasks
Service?t=72 Create Task
Service?t=498 Custom Object
Action URL Syntax
Add a Record
Here is the basic syntax for adding a new record:
- Service?t=498&a=add&id=-1&object_id=nnnnnnnnnnnn
- where:
- Service?t=498 - Service number; Specifies target is a custom object
- &a=add - Specifies the action: Add a record
- &id=-1 - Required. A value of "-1" is used for an add
- &object_id=nnnnnnnnnnnn - Object Identifier for the current object (Object name will not work.)
When users visit that URL, it launches the data entry form for that object, as determined by the user's Role on their Primary Team. Of course, that syntax is somewhat limited, because the form is completely empty -- not even the Lookup field in the related record is populated.
But by adding a little additional syntax, it is possible to pre-fill such fields. That is the subject of the next section.
Pre-filling Fields
To pre-fill the Lookup field in the related record form, add this syntax to the URL:
- &prefill_data=1&related_to_xyz={id}
- where:
- related_to_xyz - Name of the Lookup field in the related record, assuming the current object is "Xyz".
- {id} - The field containing the current record ID (id), in braces. Because the field name is in braces, its value is substituted. That puts the current record's ID into the related record's Lookup field, so that the related record points to this one.
To pre-fill other fields, add this syntax:
- &relatedRecordField={currentRecordField}
- &relatedRecordField=value
- where:
- relatedRecordField - Name of a field in the related record
- currentRecordField - Name of a field in the current record, within braces (its value is substituted)
- value - A literal value you specify. In effect, it is a constant baked into the code.
Example: Adding a Related Record
If you are tracking IT Assets, you might have a Computers object, with a related Software object to track the programs installed on each computer. As a general rule, each Computer you manage has the same operating system, with programs that come from the same company.
In that case, you might decide to pre-fill the name of the software company in the the Software records, using a value stored in the Computer record. (That field might be hidden, so that the "default" value never changes, or more likely, it will be specified for each Computer, depending on the kind of computer you are installing. In that case, the default value would be the one you install most often.)
In this example, assume that:
- "99987643526891" is the ID of the Computer object.
- "os_provider" is the field in the Computer record that contains the name of the Operating System provider
- "software_company" is the field in the Software record that records the name of the software provider
Service?t=498&id=-1&a=add&object_id=99987643526891
&prefill_data=1&related_to_software={id}&software_company={os_provider}
Passing Field Values to Other Pages
If the target URL is a different page (rather than a related-record form), you use the same "value substitution" syntax to pass values to that page:
- http://yourTargetURL?param1={currentRecordField}¶m2=value&...
- where:
- yourTargetURL - The destination page
- param1, param2 - Parameter names
- currentRecordField - Name of a field in the current record, within braces (its value is substituted)
- value - A literal value you specify

