Difference between revisions of "Manage Related Information"
imported>Aeric m (Text replace - 'Data & Presentation > Objects' to 'Data > Objects') |
imported>Aeric m (Text replace - 'Form Layouts' to 'Forms') |
||
| Line 1: | Line 1: | ||
The Manage Related Information feature acts as an action button-builder tool, to add, edit or delete action buttons in the [[Related Information]] section of a [[Record]]. The Manage Related Information [[File:Managerelatedinfobutton.gif]] icon appears when editing objects in [[ | The Manage Related Information feature acts as an action button-builder tool, to add, edit or delete action buttons in the [[Related Information]] section of a [[Record]]. The Manage Related Information [[File:Managerelatedinfobutton.gif]] icon appears when editing objects in [[Forms]]. | ||
:''Compare to [[Actions]] and [[Workflows#About States, Actions, and Decision Boxes|Actions in Workflows]]'' | :''Compare to [[Actions]] and [[Workflows#About States, Actions, and Decision Boxes|Actions in Workflows]]'' | ||
| Line 10: | Line 10: | ||
#Click '''Designer > Data > Objects''' | #Click '''Designer > Data > Objects''' | ||
#:*Open the desired object | #:*Open the desired object | ||
#:*Click the [[ | #:*Click the [[Forms]] tab | ||
#:*Navigate to the desired section in the Related Information section and click the Manage Related Information [[File:Managerelatedinfobutton.gif]] icon | #:*Navigate to the desired section in the Related Information section and click the Manage Related Information [[File:Managerelatedinfobutton.gif]] icon | ||
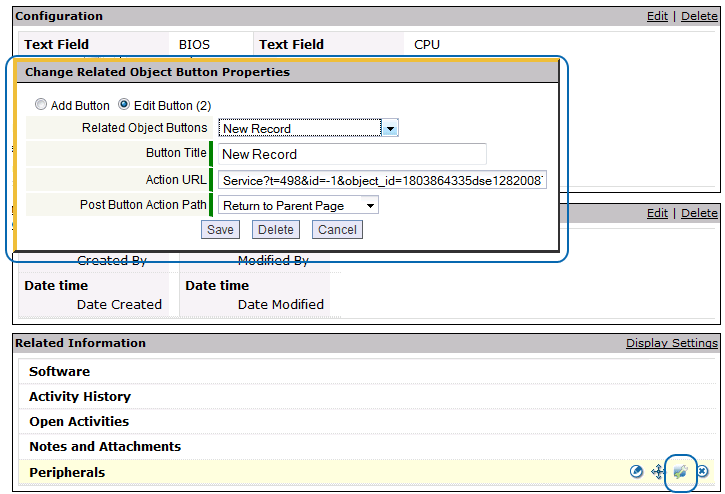
#::[[File:Changerelatedobjectbuttonproperties.gif|none|thumb]] | #::[[File:Changerelatedobjectbuttonproperties.gif|none|thumb]] | ||
Revision as of 00:25, 13 July 2011
The Manage Related Information feature acts as an action button-builder tool, to add, edit or delete action buttons in the Related Information section of a Record. The Manage Related Information ![]() icon appears when editing objects in Forms.
icon appears when editing objects in Forms.
- Compare to Actions and Actions in Workflows
How it Works
Action buttons can be created in a Related Information Section, based on a URL of any legitimate Page, Component, Action, etc. that can be created in the platform.
Add an Action Button
- Click Designer > Data > Objects
- Open the desired object
- Click the Forms tab
- Navigate to the desired section in the Related Information section and click the Manage Related Information
 icon
icon
- Complete the following information:
- Add Button
- Select the "Add" radio button
- Button Title
- Label on the button
- Action URL
- Paste the URL of the desired action
- Post Button Action Path
- Choose the page to display after the action is executed
- Stay at new Object Page
- After action is executed on new object, display new object page
- Return to Parent Page
- After action is executed, return to the original page
- Post Button Action Path
- Choose the page to display after the action is executed
- Stay at new Object Page
- After action is executed on new object, display new object page
- Return to Parent Page
- After action is executed, return to the original page
- Click [Save]
- Optionally, [Delete] the action button
Edit an Action Button
- Click Designer > Data > Objects
- Complete the following information:
- Edit Button
- Select the "Edit" radio button
- Related Object Buttons
- Choose the related object button to display
- Button Title
- Label on the button
- Action URL
- Prepopulates, but can be modified if needed
- Post Button Action Path
- Choose the page to display after the action is executed
- Stay at new Object Page
- After action is executed on new object, display new object page
- Return to Parent Page
- After action is executed, return to the original page
- Click [Save]
- Optionally, [Delete] the action button
Action URL
When building URLs for Action buttons in Related Information, it is possible to:
- Execute a JavaScript action
- Launch a new page via URL
- The new page can point to an external site, or it can perform these actions in the platform:
- Add a new record
- Pass field values of the current record as parameters to another page
- Pre-populate another record with data from the current record
To add a new record, use this syntax:
- &a=add
Learn more: Object Type Identifierhttps://www.longjump.com/networking/Service?t=nnn&id=-1&a=add&object_id=nnnnnnnnnnnn Where: Service?t=nnn //Service number; Indicates the function being applied &object_id=nnnnnnnnnnnn //Object identifier
To prefill (pre-populate) fields in a data entry form, use this syntax:
- &prefill_data=1
Learn more: Record Identifierhttps://www.longjump.com/networking/Service?t=nnn&prefill_data=1&related_to_foo={id} Where: foo //name of the object id // indicates the Record Identifier
Optionally, additional fields can be populated in the same action:
 &prefill_data=1&related_to_foo={id}&foo_field={field_name}
       Where:
        foo_field      //field name to be populated
        field_name     //contains the value of the field
- Example
In an IT Asset computers record, the operating system software Company Name might be pre-filled using this sample:
&prefill_data=1&related_to_software={id}&software_company={software_company}
