HowTo:Create a Custom Sidebar Using Graphic Images
|
For: Designers See more: |
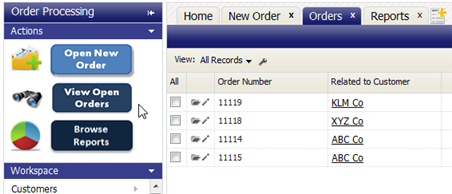
This example creates a new Sidebar for the Sample Order Processing System. It displays large, easy-to-locate graphic images for users to click on.
Upload the Images
Upload the images as documents:
- Workspace > All Items > Documents
- Click [New Document]
- Choose the files:
- Click [Upload]
Generate Links to the Images
For each uploaded image, make the image Public to generate a link to it, and save the URL.
To make an uploaded file Public:
- Workspace > All Items > Documents
- Click [Edit]
- Click the checkbox to make it a Publicly Available Document
- Click [Save]
- The image properties section for a public document contains the field, URL for Public Document, that contains a URL you can use to reference the document. That URL can then be put into an email, used as a bookmark, or put into a JSP/Html Page.
- The generated link looks like this (with newlines added for readability):
https://{domain}/networking/RepositoryPublicDocDownload
   ?id={document_id}
   &cid={company_id}
   &encode={media_type}
- where:
- document_id - The unique identifier for the document.
- company_id - The unique identifier for your instance of the platform
- media_type - Identifies the file's Media Type. For example, image/png or text/plain.
Identify Target URLs for the Sidebar Links
In general, you identify the links you need by inspecting the HTML generated for a page in your browser.
- Open a New Order (add a new record to the Orders object)
- Inspect the Orders view. Find this link for the [New Order] button.
- Copy it. It contains the ID of the Orders object.
javascript:top.showTabInIframe(
'{Orders_object_id}-1', 'Orders',
'Service?t=498&id=-1&a=add&object_id={Orders_object_id}');
- View Open Orders (invoke the view that displays open Orders)
- Inspect the list of objects in the sidebar. Find this link for the Orders entry.
- Copy it. It contains the ID of the Orders object
javascript:top.showTab(
'{view ID}', 'Orders_object_name',
'Service?t=499&object_id={view ID}');
- View Reports
- Use this link:
javascript:top.showTabInIframe('259', 'Reports', 'Service?t=259&top_tab=reports');
Create the Sidebar
- Make a copy of the HTML snippet below, and modify it to substitute the values for your instance of the platform.
- Designer > Sidebars
- Click [New Sidebar]
- 'Name: Order Processing
- Click Save]
The sidebar is created, and the design window appears. - Click [Add widget ]
- Type: Widget Tools
Additional options appear. - Widget Tool: Free Form
- Text: Paste in the HTML snippet you modified.
- Widget Title: Actions
- Type: Widget Tools
- Click [Save]
The widget appears in the design view. It can then be edited to adjust the height, if needed. (150 is about right).
After refreshing the page in the browser, the sidebar for the Order Processing app looks like this:
HTML Snippet
This snippet of HTML creates a div that contains the images the user can click to do things. ( Newlines have been added for readability.)
To use it:
- Find the ID of the Orders object in your instance of the platform and substitute it into the code for: {Orders_object_id} (four places, in all), or substitute the full image links obtained from inspecting the HTML, as directed earlier.
- Substitute the URLs for the images, obtained when you made them public documents.
<div>
<table width="160"  border="0" cellspacing="0" cellpadding="0">

<tr><td> <!-- Open a New Order (Add an Orders Object record) -->
<a href="javascript:top.showTabInIframe(
    '{Orders_object_id}-1', 'Orders',
    'Service?t=498&id=-1&a=add&object_id={Orders_object_id}');"
>
   <img src='{link_to_new_order_image}'
      width="160" height="48" border="0"
   />
</a>
</td></tr>

<tr><td> <!-- View Open Orders -->
<a href="javascript:top.showTab(
    '{Orders_object_id}', 'Orders',
    'Service?t=499&object_id={Orders_object_id}');"
>
   <img src='{link_to_view_open_orders_image}'
      width="160" height="48" border="0"
   />
</a>
</td></tr>

<tr><td> <!-- Browse Reports -->
<a href="javascript:top.showTabInIframe(
    '259', 'Reports', 'Service?t=259&top_tab=reports');"
>
   <img src='{link_to_browse_reports_image}'
      width="160" height="48" border="0"
   />
</a>
</td></tr>
</table>
</div>
Optional: Add a Workspace Widget
To continue having access to the Workspace functionality you're used to, add a Workspace widget to the side bar, in minimized form:
- Click [Add widget ]
- Type: Workspace.
- Widget Title: Workspace
- Click [Save]
The Workspace widget appears in the design view, above the Actions widget. - Click the down-arrow icon in the corner of the Workspace widget so it appears in minimized form (both in the design view and when displayed).
- Drag the Actions widget above it.
Assign the Sidebar to the Order Processing App
- Designer > Sidebars
- Click [Sidebar Assignments]
- Click [New Sidebar Assignment]
- Application: Order Processing
Additional options appear. - Global Assignment: Order Processing
The new Order Processing sidebar is now assigned to every user of the Order Processing application, and will become visible to users the next time they log in.
- Application: Order Processing


