Visibility Control and Sharing
From LongJump Support Wiki
The Visibility Control and Sharing option defines which Users have access to data (data sharing with other users) and the Access Rights (ability to read and/or modify data). Visibility Control and Sharing can be applied in:
- Learn more: Visibility Controls
Users that have the Create/Delete Views/Reports/Homepages permission can set Visibility Control and Sharing options
Setup Visibility Control and Sharing Options
These sections outline the visibility options for Pages, Folders and Calendars.
For a Page
To setup Page access rights and sharing:
- Navigate to a Home Page, click the Wrench icon

- Select New Page or Edit this Page
- In the Basic Information section, enter the following information
- Title
- Page name
- Layout
- Choose from one, two or three columns
- In the Visbility Control and Sharing section, enter the following information
- Select a Share With option:
- Everyone
- Share with all Users, Teams and Roles
- User
- Share with select Users
- Team
- Share with select Teams
- Role
- Share with select Roles
- Select an Access Rights option:
- View Only
- Can only view
- Cannot modify properties or permissions
- View and Add
- Can add and view
- Cannot modify properties or permissions
- Administrator
- Can add and view
- Can modify properties and permissions
- Select a Share With option:
- Click the [Add] button to confirm addition of the new control and sharing permissions
- Click [Save]
For a Folder
To setup Folder access rights and sharing:
- Navigate to the Documents or Image Library object
- Select a Folder
- Click the [Folder Properties] button
- In the Basic Information section, enter the following information
- Folder Name
- Folder name
- In the Visbility Control and Sharing section, enter the following information
- Select a Share With option:
- Everyone
- Share with all Users, Teams and Roles
- User
- Share with select Users
- Team
- Share with select Teams
- Role
- Share with select Roles
- Select an Access Rights option:
- View Only
- Can only view
- Cannot modify properties or permissions
- View and Add
- Can add and view
- Cannot modify properties or permissions
- Administrator
- Can add and view
- Can modify properties and permissions
- Select a Share With option:
- Optionally, click the [Add] button to add additional control and sharing permissions
- Click [Save]
- Considerations
- Prior to Version 7.0, Visibility Control and Sharing Options were inherited from the parent folder when User/Team/Role was not explicitly defined.
- Now, unspecified Users/Teams/Roles cannot inherit Visibility Control and Sharing Options from the parent folder, which protects the folder contents from Users/Teams/Roles that do not have permission to view the folder contents. In other words, Visibility Control and Sharing Options are specified individually for each folder and not inherited from parent folders.
For a Calendar
To setup Calendar access rights and sharing:
- Open a Calendar
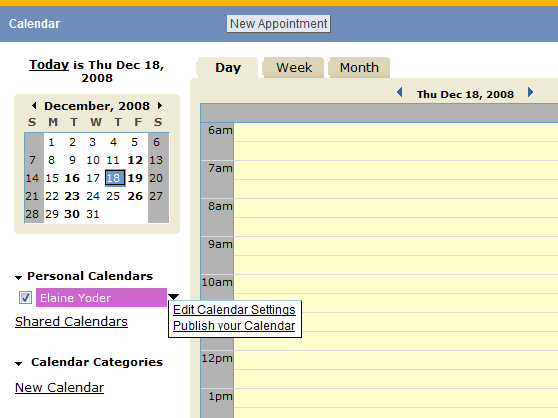
- Click the arrow next to the name of the calendar of interest and select Edit Calendar Settings
- In the Visibility Control and Sharing section, complete the following information:
- Select a Share With option for which you'll specify permissions:
- Everyone
- Share with all Users, Teams and Roles
- User
- Share with select Users
- Team
- Share with select Teams
- Role
- Share with select Roles
- For each Share With candidate, specify the Access Rights:
- View Only
- View reserved time slots and meeting details
- View and Add
- View reserved time slots and meeting details. Add and modify Calendar items.
- Administrator
- View, add, and modify Calendar items. Modify Calendar settings.
- Click the [Add] button to create additional control and sharing permissions using the steps above.
- Click [Save]
- Select a Share With option for which you'll specify permissions:
Example
This table shows an example where Everyone (except the Interns team) can View the data in this Object, selected Users have View and Add rights, and selected Roles have Administrator rights. Additional rights access can be created by adding a new row to the section.
Access Rights / Level of Access Share With View Only View and Add Administrator Everyone Y N N User: Sally Y N User: Linus N N Team: Interns N N N Team: Accounts Payable Y N Team: Disbursement N Y Role: Supervisor N Y
