Difference between revisions of "Enumerated Fields"
imported>Aeric |
imported>Aeric m (Text replace - 'Designer > Data >' to 'Designer >') |
||
| (19 intermediate revisions by the same user not shown) | |||
| Line 9: | Line 9: | ||
|} | |} | ||
Enumerated fields include these elements: | |||
:*;Display Label:Can be either an alphanumeric string or an image, or both. | |||
:::*Alphanumeric string, with optional color coding for text and background color | |||
:::*Image, optional, selected from the [[Documents]] object | |||
:::*''Not'' used to group, sort, or filter records | |||
:*;Item Value: | |||
:::*Stored as part of the record. | |||
:::*Used to group, sort, or filter records. | |||
:::*A number that can be used to define the display order. | |||
===Enumerated Types=== | |||
These [[Field Display Types]] are enumerated: | These [[Field Display Types]] are enumerated: | ||
:*Radio Buttons | :*Radio Buttons | ||
| Line 17: | Line 29: | ||
:*[[Multi Select Picklist]]s | :*[[Multi Select Picklist]]s | ||
==Displaying Enumerated Fields== | ===Displaying Enumerated Fields=== | ||
Enumerated Fields in [[View]]s can provide users with visual indicators of a data metrics. In this example, a movie library View is enhanced with the addition of stars to rank the movies by preference. Although the ranking (Picklist Value) is not displayed, it is used to sort the list. | Enumerated Fields in [[View]]s can provide users with visual indicators of a data metrics. In this example, a movie library View is enhanced with the addition of stars to rank the movies by preference. Although the ranking (Picklist Value) is not displayed, it is used to sort the list. | ||
| Line 37: | Line 49: | ||
|} | |} | ||
= | ===Using Enumerated Fields with Other Platform Elements=== | ||
==Using Enumerated Fields with Other Platform Elements== | |||
Because Picklist Values can contain alphanumeric characters, additional functionality becomes available, as listed here: | Because Picklist Values can contain alphanumeric characters, additional functionality becomes available, as listed here: | ||
| Line 78: | Line 62: | ||
:;REST or JAVA API:The Picklist values are returned (not the display label) | :;REST or JAVA API:The Picklist values are returned (not the display label) | ||
:;Conditional Layouts:Layout rules can use the Picklist values | :;Conditional Layouts:Layout rules can use the Picklist values | ||
===Manage and Reorder Values=== | |||
{{:Manage and Reorder Enumerated Values}} | |||
==Checkboxes and Radio Buttons== | |||
Working with Checkboxes and Radio Buttons is almost identical to the process for Working with Picklists, described next. The only real difference is in the way that values are displayed, and the number of selections a user can make. | |||
==Picklists== | |||
{{:Working with Picklists}} | |||
==Global Picklists== | |||
===Create a Global Picklist=== | |||
#Click '''Designer > Objects > {object} > Fields''' | |||
#Click '''[New Field]''' | |||
#Fill in the information in the sections below | |||
#Click '''[Save]'''<br/>The field is added, and the field-definition is shown. | |||
{{Note|To [[#Manage and Reorder Values|Manage and Reorder Values]], go to the field definition in the [[Global Picklists]]--but note that any changes made to a Global Picklist apply to all fields that reference it.}} | |||
====Basic Information==== | |||
:* '''Display Type -''' Global Picklist | |||
:* '''Picklist -''' Select one of the predefined [[Global Picklists]], or one that you have created. | |||
{{:Common:Enumerated Field Sections}} | |||
==Multi Select Picklists== | |||
{{:Multi Select Picklist}} | |||
==Dependent Picklists== | |||
{{:Dependent Picklist}} | |||
Latest revision as of 23:17, 22 June 2012
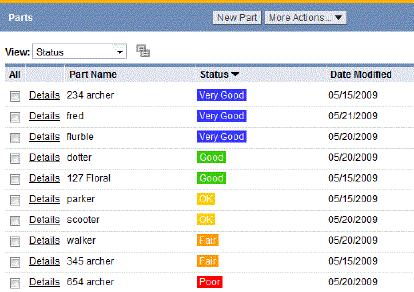
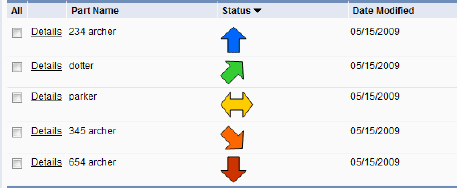
Enumerated fields can provide a powerful visual impact by displaying a graphic image or color-coded label in place of field values.
About Enumerated Fields
Enumerated fields have an associated numeric value, which can be used to group, sort or filter data in Views and Reports. (In Reports, enumerated fields can appear as color-coded labels, only.)
Enumerated fields include these elements:
- Display Label
- Can be either an alphanumeric string or an image, or both.
- Alphanumeric string, with optional color coding for text and background color
- Image, optional, selected from the Documents object
- Not used to group, sort, or filter records
- Item Value
- Stored as part of the record.
- Used to group, sort, or filter records.
- A number that can be used to define the display order.
Enumerated Types
These Field Display Types are enumerated:
Displaying Enumerated Fields
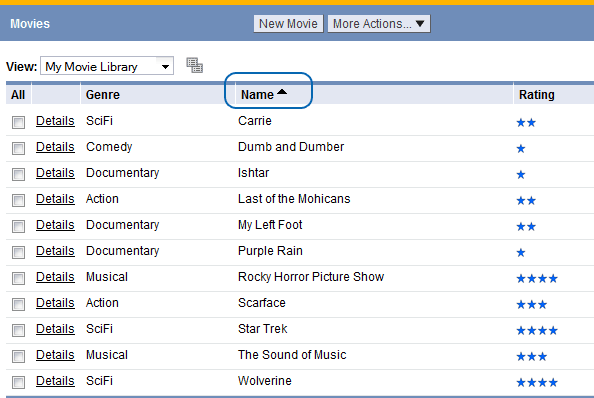
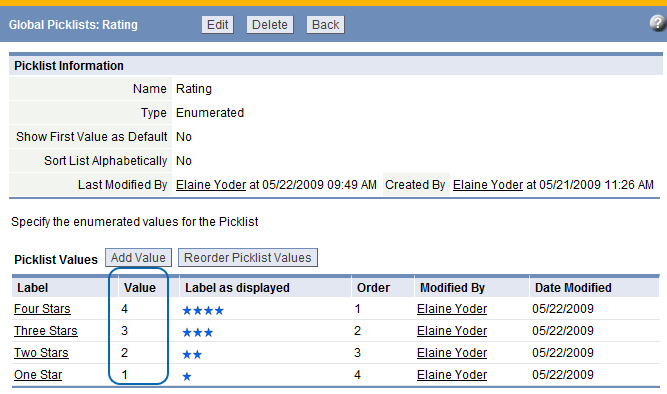
Enumerated Fields in Views can provide users with visual indicators of a data metrics. In this example, a movie library View is enhanced with the addition of stars to rank the movies by preference. Although the ranking (Picklist Value) is not displayed, it is used to sort the list.
- The ranking (with 1-4 stars) is created by adding a series of images and values to eligible Field Display Types:
Because the Picklist Value is stored in the database, it can be used in these areas of the platform: - Sort order in Views and Reports
- Filters in Views and Reports
- Color coding criteria in Views and Reports
- Grouping criteria in Reports
Learn more: Using Enumerated Picklists with Other Platform Elements
Using Enumerated Fields with Other Platform Elements
Because Picklist Values can contain alphanumeric characters, additional functionality becomes available, as listed here:
- Sort order
- Use the Picklist value in Views and Reports to define sort order
- Grouping
- Use the Picklist value to Group records in Views and Reports
- Display in Views
- The Display Labels are shown when displaying a record and in Views. Based on the options selected, the image and the text colors are shown.
- Color coding in Views
- Criteria can be specified using Display Labels or Picklist values; The first match is done using the display label, followed by the Picklist value
- Searches/Filters in Views
- Criteria can be specified using display labels or Picklist values; The first match is done using the display label, followed by the Picklist Value
- Global Search
- Global search can use the Picklist values
- Display in Reports
- The Display Labels are shown (no images or color coding are displayed)
- Reports must not use the Group option
- REST or JAVA API
- The Picklist values are returned (not the display label)
- Conditional Layouts
- Layout rules can use the Picklist values
Manage and Reorder Values
Specify Display Text, Colors, Images, and Grouping Labels
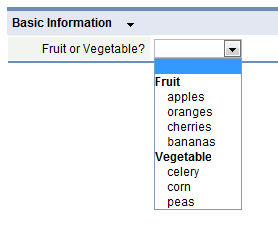
The Enumerated Values section of the field-definition page lets you specify display-text, colors, images, and grouping labels, as well as the values returned by user selections:
Click [Manage Values] to specify display text, color, images, and grouping labels.
- Fields
- Alphanumeric Characters are allowed in labels and values, including special characters (+ / ' - _) and spaces.
- Display Label - The label to display in the list.
- Value - The actual value that is stored in a record (or returned to a program) when this item is chosen from the list.
- Image - Specify an image to display (learn more below)
- Show only Image in View mode - Whether to show the image alone, or together with the label.
- Font color - Foreground color
- Background color - Color of the area in which the text is displayed
- Use Label for grouping - The specified label becomes a heading in the list, rather than a selectable value (learn more below)
- Specify images
- To specify images, first upload them to the platform as Documents. This example shows records that were created after selecting such images from a picklist:
- Specify grouping labels
- Click Use Label for Grouping to use a label as a group indicator, rather than making it a selection the user can click.
- This option is useful when a picklist is long, and can be organized into groups.
- Considerations
-
- The Use Label for grouping option is available only for Picklists
- After the Use Label for grouping option is selected, the Sort List Alphabetically option is reset to No (otherwise, the label won't be helpful).
- If the Use Label for grouping option is selected, the enumerated values are not available for dependent field associations.
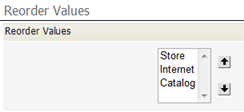
Reorder Values
In the Enumerated Values section of the field-definition page, click [Reorder Values] to change the order in which the values appear:
Checkboxes and Radio Buttons
Working with Checkboxes and Radio Buttons is almost identical to the process for Working with Picklists, described next. The only real difference is in the way that values are displayed, and the number of selections a user can make.
Picklists
A Picklist is a field that can contain a list of values. It appears as a dropdown list when displayed.
Create a Picklist
- Click Designer > Objects > {object} > Fields
- Click [New Field]
- Provide the information in the sections below.
- Click [Save]
The field is added, and the field-definition is shown. You can now Manage and Reorder Values to specify display text and colors, images, and grouping labels.
Basic Information
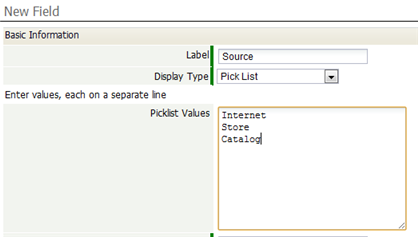
- Specify the basic characteristics of the field:
- Label - The text that appears as the field name
- Display Type - Picklist
- Picklist Values - For a simple Picklist that returns the same values it displays, with no special colors, images, or groups for the display values, you can simply enter the values, as shown here:
- Otherwise, wait until the Picklist has been created, then Manage and Reorder Values.
- Maximum Storage Length - The String length of the longest value in the list.
- Use First Value as Default - Otherwise, the field is initially empty.
- Sort List Alphabetically - Otherwise, you manually arrange the order.
- Always Required - A selection must be made when adding or updating a record.
- Field Name - Automatically created by the system (but you can change it here)
Display Attributes
- Determine where the field is displayed in the default form, and whether or not the field is required when adding or updating a record.
Default Value
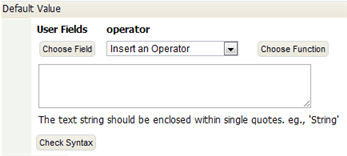
In general, the default value you specify will be a simple String. For example: 'rush'. But it is also possible to select functions and specify arguments, creating a formula expression that returns the default value.
- Considerations
-
- The default value must resolve to the value of an entry in the list of enumerated items (not a label).
- If the value resolves to a string which is not in the list of the enumerated items, it is as though no default were specified. Nothing is pre-selected in the Enumerated Field.
Role-Based Field Visibility
Set Field Visibility based on Role. This option defines the Roles that are permitted to view and use the designated Field. Available field settings include:
- Visible
- Read-Only
- Hidden
This control is created when a Field is Added to an object.
- Learn more: Visibility Controls
- Considerations
- When a field is added to a Form, the field visibility control is set to Visible by default
- When a new role is added, that role receives Visibility rights to all the fields across all the objects
- When this control is specified for a field, it will be enforced in the Field Audit Log; This means that the user Role determines whether a record is visible in an Audit Log
Description Information
- Include a description of the field and its use. This information is only visible to users with rights to customize this field.
Global Picklists
Create a Global Picklist
- Click Designer > Objects > {object} > Fields
- Click [New Field]
- Fill in the information in the sections below
- Click [Save]
The field is added, and the field-definition is shown.
Note: To Manage and Reorder Values, go to the field definition in the Global Picklists--but note that any changes made to a Global Picklist apply to all fields that reference it.
Basic Information
- Display Type - Global Picklist
- Picklist - Select one of the predefined Global Picklists, or one that you have created.
Display Attributes
- Determine where the field is displayed in the default form, and whether or not the field is required when adding or updating a record.
Default Value
In general, the default value you specify will be a simple String. For example: 'rush'. But it is also possible to select functions and specify arguments, creating a formula expression that returns the default value.
- Considerations
-
- The default value must resolve to the value of an entry in the list of enumerated items (not a label).
- If the value resolves to a string which is not in the list of the enumerated items, it is as though no default were specified. Nothing is pre-selected in the Enumerated Field.
Role-Based Field Visibility
Set Field Visibility based on Role. This option defines the Roles that are permitted to view and use the designated Field. Available field settings include:
- Visible
- Read-Only
- Hidden
This control is created when a Field is Added to an object.
- Learn more: Visibility Controls
- Considerations
- When a field is added to a Form, the field visibility control is set to Visible by default
- When a new role is added, that role receives Visibility rights to all the fields across all the objects
- When this control is specified for a field, it will be enforced in the Field Audit Log; This means that the user Role determines whether a record is visible in an Audit Log
Description Information
- Include a description of the field and its use. This information is only visible to users with rights to customize this field.
Multi Select Picklists
Multi Select Picklists provide options in a field to make multiple selections from a list of values in a Global Picklist.
In the global picklist, although the labels for the enumerated values may contain commas, the enumerated values may not contain commas.
The orientation can be vertical or horizontal
- When displayed vertically, each label is shown on a separate line
- When displayed horizontally, the labels are shown on the same line, separated by commas
For Multi Select Picklist fields where the labels include commas, vertical orientation is the better choice
Dependent Picklists
A Dependent Picklist provides the ability to define (or filter) a group of choices, based on a some other value.
About Dependent Picklists
These field display types can be used to build Dependent Picklists:
- Radio Buttons
- Picklists
For example, in manufacturing, a computer might be created from a few Sub Assembly items, each made up of available component parts. The Component Parts might be enumerated, based on inventory level, for example.
- Example
Field Name Field Display Type Available Values Sub Assembly Picklist External Case Assembly / Circuit Board Kit / Data Storage Devices / Ports and cables
Component Parts Dependent Picklist (select Sub Assembly as Dependent Field) ST-2342 / ST-99843 / ST-3209 / ST-0094 / FR-23432 / FR-6530 / FR-9093 / RF-234 / RF-235 / RF-237 / GTT-34534 / GTT-0779 / GTT-300567 / GTT-300595 / GTT-300827 / GTT-300857
- The resulting Child Values are created based on associations created between Component Parts and the Sub Assembly Parent Value.
- Considerations
-
- It is not possible to specify default values for a dependent picklist. (A separate default would be needed for each parent value.)
Using Dependent Picklists
- Considerations
-
- After a dependent field association is created, the Use Label for grouping option cannot be enabled for any of the parent or dependent field values
- A field cannot be deleted if it is a "parent" for a dependent field
- If the "parent" field of a dependent field is changed, a confirmation message appears, requesting the user to acknowledge that data will be lost if the change is executed
- Dependent picklist values cannot be reordered
- It is not possible to specify a default value for a dependent picklist.
Add a Dependent Picklist
For each Dependent Picklist, a "parent" field is selected, which defines the top-level field in the dependency hierarchy. Additional values ("child" fields) are defined within the dependent picklist. The resulting dependent picklist is created by associating "child" field(s) with each "parent" field.
This is a two-step process; first, create the "parent" field, then create the Dependent Picklist (the "child" field).
- Using the instructions in Fields, create a new field of any of the following types, add picklist values and save the field (this will be used as the parent field):
- Radio Buttons
- Picklists
- Using the instructions in Fields, create a new field of type: Dependent Picklist, and enter the following information:
- Label
- The field label that will be displayed
- Display Type
- Dependent Picklist
- Parent Field
-
- Select the "parent" field (created in the previous step)
- Enter the picklist values
- Optionally, modify any of the remaining sections, using the instructions in Fields
- Click [Save]
- In the Enumerated Values section, click [Manage Values] to specify the collection of all possible values.
- In the Dependent Picklist Associations section (at the bottom):
- Click the [Add Associations] button.
- Choose the Dependent Picklist Values to be associated with each Parent Value.

